Part III: How Do You Bring A Virtual Cat Into The Real World?
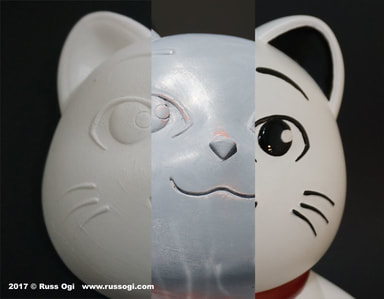 Raw 3D print, primer, finished
 If you would like to read about how this project started, you can read part 1 here or part 2 about the creation of the virtual model here.
Once the changes to the virtual model were completed and approved, a 3D printed version of the model was made using a process called Fused Filament Fabrication (FFF).
For those unfamiliar with 3D printing, the software for the 3D printer takes the virtual model and divides it into layers. Depending on the part, this could be hundreds, even thousands of layers.
The layer data is sent to the 3D printer where the machine recreates each digital layer as an outline in plastic. It does this using a plastic filament that is heated and fed through an extruder. Each physical layer is stacked one on top the other.
Each layer is hot enough to adhere to the layer before it. With all the layers stacked on one another the result is a 3D physical replica of the computer sculpture.
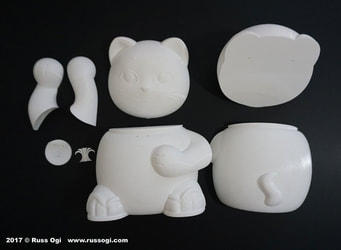 Sections of the model before assembly
 Once the part is 3D printed, it goes through an extensive finishing process. The entire Cat was printed in several sections. Some of the sectioning was done to fit the build chamber of the 3D printer. Other parts were sectioned for ease of painting.
Because the Cat has multiple colors, the different colored parts either need to be painted separately, parts need to be masked or different colors are hand painted.
When parts of a model are supposed to be separate objects, I often prefer creating the parts separately. The Cat's medallion is a great example.
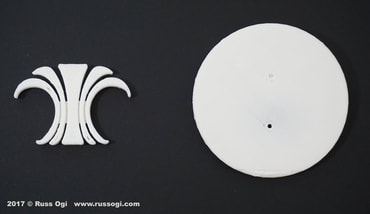 Medallion parts
 The Cat's medallion was printed separately from the Cat and the circular “coin” section was printed separately from the Island Insurance logo. In this case, the 3D printer was entirely capable of 3D printing the medallion with logo on the Cat all in one shot.
But if everything was one piece, to paint the medallion blue would have meant masking the Cat and logo in order to paint the blue or would have required careful brush painting by hand.
I often spray paint rather than brush as it's quicker and you don't have concerns about brush strokes in the finish. But doing so usually requires masking with finishes that have multiple colors.
Printing separate parts is one of the construction strategies I use to make fabrication easier. Often, this adds extra time in the CAD modeling stage of the project but can save considerable effort on the physical finishing side. Also, the finished product looks better and generally feels higher in quality.
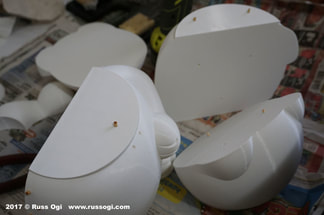 Alignment points
 With the computer model, I can ensure the parts fit perfectly. The trick is to make sure that the virtual precision translates into the physical model.
To ensure each section lines up as accurately as possible in the real world, I create alignment points in the computer model. The alignment points are pits that I fit small dowels into. In this case, I use BBQ skewers.
The alignment points are 3D printed as part of the model. In the picture to the left, you can see the alignment points some of which have the wooden dowels in them.
 Partial assembly
 The first step is assembly. I didn't assemble all the parts at the same time. I attach the main sections like the head and body halves frist.
I then attach the assembled head to the assembled body. I leave the raised arm, the medallion and logo separate until later.
After the initial assembly, I give the sections a rough sand to reduce the printlines. Then, I use a filler to even out the surface. It's the same basic process that auto body shops use.
Once the model feels smooth, I do a primer coat of paint. The primer generally helps the paint adhere to the plastic and depending on the 3D print material, helps to seal the surface of the model. The image to the left shows the first coat of primer.
This first coat of primer also helps to show any places on the model's surface that needs more attention.
When I am satisfied with the model's surface, I apply a final primer coat. The Cat then gets an undercoat of black. At this point, I attach the head and right arm so I can blend the seams for those parts before the final paint goes on.
 Hand painted sections
 After the arm is attached, I start the final top coat of white paint. I opted to hand paint the collar red instead of masking it off. The decision to mask or brush paint is often a preference of the artist.
Each technique offers different benefits and limitations. I find that the situation usually dictates which technique I use.
I chose to brush paint the collar since the painted edges were well defined and getting the tape under the raised arm would be difficult. I also chose to hand paint the paws and slippers for similar reasons.
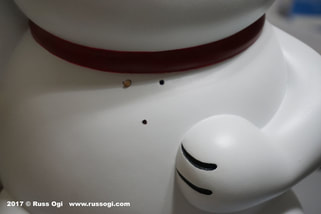
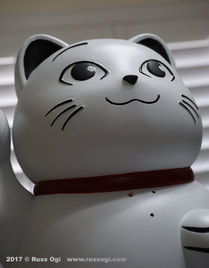 Almost finished
 Last but not least, was the face. I again chose to freehand the painting of the Cat's facial features rather than tape masking. I used a magnifying glass to make sure I got clean painted edges. Since the face was the focal point, this painting was especially nerve wracking.
The pupils were a bit tricky. To get the shiny look of eyeballs, I opted to apply a gloss coat of clear nail polish over the black and white paint. The self leveling and quick drying nature of nail polish was perfect for the eyes.
The picture on the left shows the Cat's eyes prior to the gloss coat.
With that, the Island Cat was done. Thanks for following along. Please share any painting or fabrication techniques you use in the comments below.
 RSS Feed