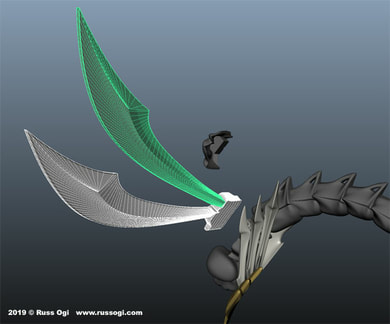
 Preparing the virtual model in Maya.
 If you've been working with filament-based 3D printing systems for a while, you've most likely come across the need to adjust infill properties to balance 3D print time, material usage and part strength.
Well, I recently came across the need to backfill a 3D printed part with epoxy.
When doing this is the past, I would print a part hollow as using infill would compartmentalize the interior of the part.
However, a new setting in the Cura 3.6 slicer software has an infill setting called Gyroid.
Sounds like something out of a bad sci-fi movie. This infill is based on the Gyroid, a mathematical "shape" whose definition I don't think I could adequately explain.
You can find it's definition and history on Wikipedia.
What this infill does is creates an infill pattern that provides support and structure to a 3D printed part but it leaves all the interior space connected. In other words, I can use Gyroid infill, pour epoxy into the print and have the epoxy fill the entire inside of the part.
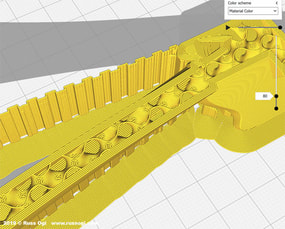
Cross section showing the Gyroid infill.
 What goes in at the top makes it to the bottom.
 Does it work? Let's find out.
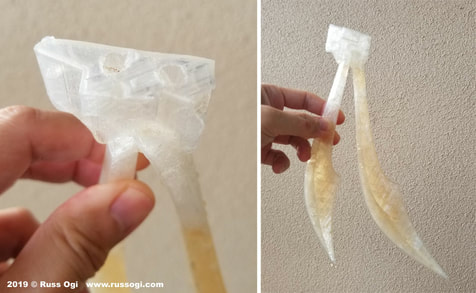
So I could see what was happening inside the print (pictured below), I used natural PLA filament which is clear.
Once the part was printed, I drilled a couple of holes in one end to serve as fill and vent holes. I then filled the 3D print with tea to give the liquid some color and make it easier to track its flow.
And yes, the Gyroid infill does indeed create an interior continuous volume while still providing support for the model.
How does the Gyroid infill compare to other infill types with regard to material usage and print times?
Using Cura, I processed a couple of other infill types I've used in the past: Lines and Triangles. The statistics below are based on 5% infill.
Gyroid = 52g of material @ 4hr 33min
Lines = 52g of material @ 4hr 31min
Triangles = 52g of material @ 4hr 33min
Keep in mind the numbers above are the estimates from the software. I've only actually printed the Gyroid infill version of the print.
Same material usage and similar 3D print times and Gyroid definitely works as a way to allow for backfilling of a 3D printed part. From what I've read online, people claim that Gyroid infill has a very good strength to weight ratio compared to other infill types.
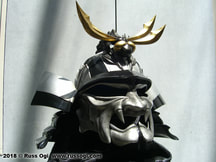 Tombo Kabuto
 This may be my new favorite infill; comparable to other infills in 3D print times and material usage but adds the versatility to be able to backfill a part.
The pictures for this post are of the restomod of my Tombo Kabuto (Dragonfly Helmet) piece to prepare it for its new home at the Kona Kitchen restaurant in Lynnwood Washington. Follow me on Instagram, Facebook and Twitter where I'm posting updates of this and other projects I'm working on.
Do you have any tips or tricks when working with filament-based 3D printing? Have you worked with the Gyroid infill? Please leave your thoughts in the comments below.
Till next time, a hui hou.

 RSS Feed